
一、提取AMDGopDriver.rom和vbios_1002_164c.bin
准备BIOS:ACB19103.bin,WIN系统操作
1、使用ubu处理bios,导出AMDGopDriver.efi
2、再使用edk2-BaseTools-win32-master工具 把AMDGopDriver.efi 转为AMDGopDriver.rom
所在目录CMD:
.\EfiRom.exe -f 0x1002 -i 0xffff -e .\AMDGopDriver.efi
使用这个命令进行转换,1002是amd生厂商标识。-i 0xffff这个是产品id,这个随便四位十六进制都行(不需要写具体对应显卡编号),你就会得到AMDGopDriver.rom
3、PVE下操作,提取vbios_1002_164c.bin
nano vbios.c
gcc vbios.c -o vbios #需要安装gcc apt install gcc
./vbios #生成vbios_1002_164c.bin
vbios.c的源码
#include <stdint.h>
#include <stdio.h>
#include <stdlib.h>
typedef uint32_t ULONG;
typedef uint8_t UCHAR;
typedef uint16_t USHORT;
typedef struct {
ULONG Signature;
ULONG TableLength; // Length
UCHAR Revision;
UCHAR Checksum;
UCHAR OemId[6];
UCHAR OemTableId[8]; // UINT64 OemTableId;
ULONG OemRevision;
ULONG CreatorId;
ULONG CreatorRevision;
} AMD_ACPI_DESCRIPTION_HEADER;
typedef struct {
AMD_ACPI_DESCRIPTION_HEADER SHeader;
UCHAR TableUUID[16]; // 0x24
ULONG VBIOSImageOffset; // 0x34. Offset to the first GOP_VBIOS_CONTENT block from the beginning of the stucture.
ULONG Lib1ImageOffset; // 0x38. Offset to the first GOP_LIB1_CONTENT block from the beginning of the stucture.
ULONG Reserved[4]; // 0x3C
} UEFI_ACPI_VFCT;
typedef struct {
ULONG PCIBus; // 0x4C
ULONG PCIDevice; // 0x50
ULONG PCIFunction; // 0x54
USHORT VendorID; // 0x58
USHORT DeviceID; // 0x5A
USHORT SSVID; // 0x5C
USHORT SSID; // 0x5E
ULONG Revision; // 0x60
ULONG ImageLength; // 0x64
} VFCT_IMAGE_HEADER;
typedef struct {
VFCT_IMAGE_HEADER VbiosHeader;
UCHAR VbiosContent[1];
} GOP_VBIOS_CONTENT;
int main(int argc, char** argv)
{
FILE* fp_vfct;
FILE* fp_vbios;
UEFI_ACPI_VFCT* pvfct;
char vbios_name[0x400];
if (!(fp_vfct = fopen("/sys/firmware/acpi/tables/VFCT", "r"))) {
    perror(argv[0]);
    return -1;
}

if (!(pvfct = malloc(sizeof(UEFI_ACPI_VFCT)))) {
    perror(argv[0]);
    return -1;
}

if (sizeof(UEFI_ACPI_VFCT) != fread(pvfct, 1, sizeof(UEFI_ACPI_VFCT), fp_vfct)) {
    fprintf(stderr, "%s: failed to read VFCT header!\n", argv[0]);
    return -1;
}

ULONG offset = pvfct->VBIOSImageOffset;
ULONG tbl_size = pvfct->SHeader.TableLength;

if (!(pvfct = realloc(pvfct, tbl_size))) {
    perror(argv[0]);
    return -1;
}

if (tbl_size - sizeof(UEFI_ACPI_VFCT) != fread(pvfct + 1, 1, tbl_size - sizeof(UEFI_ACPI_VFCT), fp_vfct)) {
    fprintf(stderr, "%s: failed to read VFCT body!\n", argv[0]);
    return -1;
}

fclose(fp_vfct);

while (offset < tbl_size) {
    GOP_VBIOS_CONTENT* vbios = (GOP_VBIOS_CONTENT*)((char*)pvfct + offset);
    VFCT_IMAGE_HEADER* vhdr = &vbios->VbiosHeader;

    if (!vhdr->ImageLength)
        break;

    snprintf(vbios_name, sizeof(vbios_name), "vbios_%x_%x.bin", vhdr->VendorID, vhdr->DeviceID);

    if (!(fp_vbios = fopen(vbios_name, "wb"))) {
        perror(argv[0]);
        return -1;
    }

    if (vhdr->ImageLength != fwrite(&vbios->VbiosContent, 1, vhdr->ImageLength, fp_vbios)) {
        fprintf(stderr, "%s: failed to dump vbios %x:%x\n", argv[0], vhdr->VendorID, vhdr->DeviceID);
        return -1;
    }

    fclose(fp_vbios);

    printf("dump vbios %x:%x to %s\n", vhdr->VendorID, vhdr->DeviceID, vbios_name);

    offset += sizeof(VFCT_IMAGE_HEADER);
    offset += vhdr->ImageLength;
}

return 0;
}
二、配置配置 GRUB
nano /etc/default/grub
修改为:
GRUB_CMDLINE_LINUX_DEFAULT=“quiet initcall_blacklist=sysfb_init”

update-grub
reboot
三、屏蔽驱动
nano /etc/modprobe.d/pve-blacklist.conf
在里面加入
blacklist nvidiafb
blacklist amdgpu
blacklist i915
blacklist snd_hda_intel
options vfio_iommu_type1 allow_unsafe_interrupts=1
最后更新initramfs
update-initramfs -u -k all
reboot
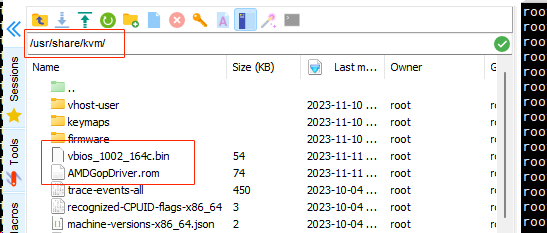
四、用MobaXterm将AMDGopDriver.rom和vbios_1002_164c.bin放到/usr/share/kvm/目录
五、配置win10虚拟机参数
nano /etc/pve/qemu-server/xxx.conf #xxx.conf的xxx是虚拟机编号
1、在cpu:hots 后面添加 ,hidden=1
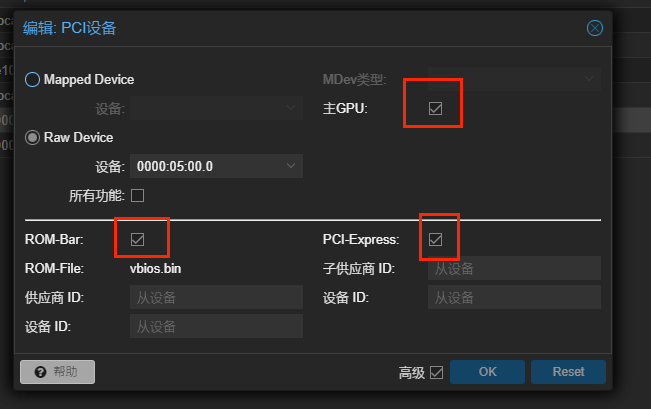
2、hostpci1: 0000:05:00.0,pcie=1,x-vga=1 后面添加 ,romfile=vbios_1002_164c.bin
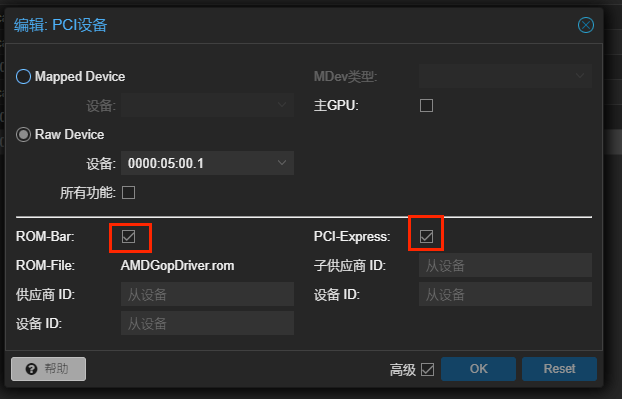
3、hostpci1: 0000:05:00.1,pcie=1 后面添加 ,romfile=AMDGopDriver.rom
Amd的核显(独显)编号和hdmi声卡编号一般挨着的,不一定是我这里05.00.0和05.00.1
虚拟机采用ovmf+i440fx或者q35都行,如果i440fx机型不需要pcie=1参数
显卡
声卡
bios: ovmf
boot: order=scsi0;scsi1;ide2
cores: 4
cpu: host,hidden=1
efidisk0: local:101/vm-101-disk-0.qcow2,efitype=4m,size=528K
hostpci0: 0000:05:00.0,pcie=1,romfile=vbios.bin,x-vga=1
hostpci1: 0000:05:00.1,pcie=1,romfile=AMDGopDriver.rom
ide2: none,media=cdrom
machine: pc-q35-8.0
memory: 4096
meta: creation-qemu=8.0.2,ctime=1699700553
name: win10
net0: e1000=56:61:6F:8B:12:20,bridge=vmbr1,firewall=1
numa: 0
onboot: 1
ostype: win10
scsi0: local:101/vm-101-disk-1.qcow2,iothread=1,size=100G,ssd=1
scsi1: local:101/vm-101-disk-2.qcow2,iothread=1,size=100G,ssd=1
scsihw: virtio-scsi-single
smbios1: uuid=44fbaf93-480c-4c0a-a817-dc8678c35141
sockets: 1
vga: none
vmgenid: 3c0df006-3932-436f-8823-b03806223660
#pve unraid核显直通多个efi多个rom合并转化成1个rom教程
.\EfiRom.exe -f 0xffff -i 0xffff -b .\vbios_1002_164c.bin -e .\AMDGopDriver.efi -o 5700u.rom
就这样一行命令简单合并转化出来1个rom,x-vga后面就挂一个5700u.rom就是了。如果不能直通,你把-f -i 后面编号改为真实编号比如:-f 0x1002 -i 0x164c
六,系统安装完后
先打RadeonResetBugFixService.exe补丁
下载解压放在c盘根目录,cmd管理员模式下运行 RadeonResetBugFixService.exe install
再安装AMD驱动。
七、过虚拟化文件
dpkg -l|grep kvm

dpkg -i pve-qemu-kvm_8.1.2-4_amd64_anti_detection20231105.deb
nano /etc/pve/qemu-server/101.conf
首行插入:
AMD
args: -cpu host,hypervisor=off,vmware-cpuid-freq=false,enforce=false,host-phys-bits=true, -smbios type=0,version=UX305UA.201 -smbios type=1,manufacturer=ASUS,product=UX305UA,version=2021.1 -smbios type=2,manufacturer=AMD,version=2021.5,product=’ AMD Ryzen 7 5700U’ -smbios type=3,manufacturer=XBZJ -smbios type=17,manufacturer=KINGSTON,loc_pfx=DDR4,speed=3200,serial=114514,part=FF63 -smbios type=4,manufacturer=AMD,max-speed=3200,current-speed=3200
Intel
args: -cpu host,hypervisor=off,vmware-cpuid-freq=false,enforce=false,host-phys-bits=true, -smbios type=0,version=UX305UA.201 -smbios type=1,manufacturer=ASUS,product=UX305UA,version=2021.1 -smbios type=2,manufacturer=Intel,version=2021.5,product=‘Intel i7-12700’ -smbios type=3,manufacturer=XBZJ -smbios type=17,manufacturer=KINGSTON,loc_pfx=DDR4,speed=3200,serial=114514,part=FF63 -smbios type=4,manufacturer=Intel,max-speed=3200,current-speed=3200